

Introduction
Healthcare practitioners use OpenEMR as a strong open-source application that functions as an Electronic Medical Records (EMR) system together with practice management capabilities. The clinic needs to follow several vital steps to install OpenEMR, which we will describe in the following section. As a step-by-step guide, it will provide you with a straightforward path to set up OpenEMR while maximizing its available features.
Step 1: Download and Extract OpenEMR
1.Download OpenEMR
- Users should retrieve the most up-to-date version of OpenEMR (openemr-7.0.2.zip) through Source Forge from the OpenEMR website.
- You should enable your browser to allow downloading files without interruption.
2.Extract the OpenEMR Archive
- Right-click and open the downloaded zip file through the Properties dialogue box available on your operating system.
- The file extraction process depends on selecting “Unblock” in the Windows Properties box in order to prevent file blocking.
- Extract the zip file to a folder on your computer (e.g., C:\OpenEMR).
3.Rename the Directory (Optional)
- You should rename the directory to openemr if you wish to simplify its name.
Step 2: Download and Install XAMPP
1.Download XAMPP
- Users should navigate to the Apache Friends official website and retrieve the newest version of Windows XAMPP from this page.
2.Install XAMPP
- Launch the XAMPP installer through the download and execute the built-in instructions to perform the setup.
- The default installation settings should remain selected unless you require custom modifications.
Step 3: Move OpenEMR to the XAMPP Directory
- You need to place OpenEMR files at the XAMPP home directory.
1.Navigate to the XAMPP Directory
- The XAMPP is typically located at C:\xampp\htdocs.
2.Move OpenEMR Files
- After extracting the OpenEMR folder, you should cut it before placing it inside XAMPP’s htdocs directory.
- The openemr directory should be located at C:\xampp\htdocs\openemr.
Step 4: Configure XAMPP
1.Start XAMPP Services
- Users should start the XAMPP Control Panel to begin the Apache and MySQL services.
2.Verify Services
- The services must operate without producing any errors.
Step 5: OpenEMR Setup via Web GUI
- Users can establish OpenEMR through the web.
1.Access OpenEMR Setup
- You should access OpenEMR through the web browser by going to http://localhost/openemr.
2.Follow Setup Instructions
- Multiple steps of the setup process installation include the creation of a new database and configuration tasks.
- Check all file system permissions for correctness before continuing forward.
3.Create Database
- When prompted, you will decide to either establish a new database or pick one from the existing collection.
- Perform the necessary actions using the instructions provided by the interface.
4.Finalize Configuration
- You must finish the setup operations by creating your first login details, including username and password..
Step 6: Clinic Setup
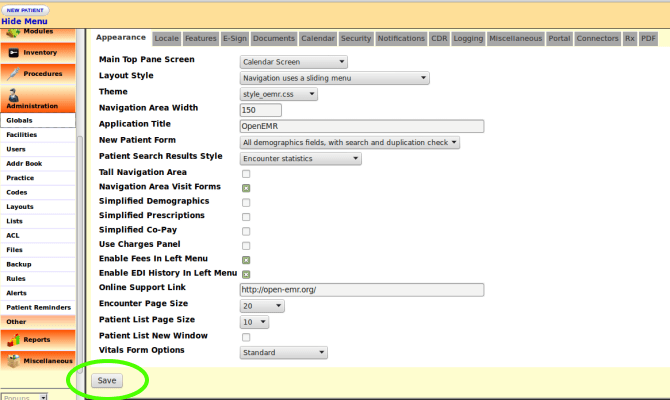
1.Enter Global Settings
- Users should configure the application settings of OpenEMR through these steps to establish the interface theme and date/time presentation.
2.Enter Facility-Specific Settings
- During setup, users must provide practice and business identifiers together with tax information and insurance numbers.
3.Create User Accounts
- All users accessing OpenEMR need to receive accounts during the setup process.
4.Enter Contact Information
- The user can add their contact information and business account contact details.
5.Practice Settings
- Configure pharmacy and insurance company information, along with accepted document formats.
Step 7: External Data Loads
1.Load Codesets
- The implementation of ICD10, RXNORM, and SNOMED and CQM_VALUSET codesets through import processes will enhance the clinical documentation system.
2.Calendar Configuration
- The system requires configuration to define appointment types together with the providers’ planned availability times.
Step 8: Useful Configurations
1.Customize Templates
- Tailor notes templates to your practice’s needs.
2.Integrate with Other Systems
- OpenEMR should be connected to lab systems, billing software, and telehealth platforms.
Troubleshooting Tips
- The Apache server must possess correct permissions that allow file reading and writing operations in the OpenEMR directory.
- Check MySQL settings to resolve any database connection issues by verifying proper database configuration.
- Service disruptions of XAMPP require users to reset both Apache and MySQL components.
Real-World Examples and Case Studies
- The clinic based in Vermont utilized OpenEMR Cloud on AWS, which resulted in a 70% reduction in server maintenance expenses while also enabling better scalability during busy patient periods.
- A Texas-based large hospital decided to run OpenEMR on-premises for customized data security which delivered smooth integration with their hospital infrastructure
Conclusion
To implement OpenEMR at a clinic, administrators need to follow multiple steps that start with software download and then proceed through configuration and clinic-specific setup. OpenEMR users can achieve operational streamlining and patient care improvement while maintaining regulatory standards through their robust features and by following the specified guidelines.
FAQ
-
1. What are the system requirements for installing OpenEMR on Windows?
Your system requirements for OpenEMR installation are Windows Server 2012 and later versions or Windows 10/11 together with XAMPP or WampServer and Apache HTTP Server running PHP 7.4 or higher with essential extensions alongside MySQL version 5.6 or above.
-
2. How do I troubleshoot common issues during OpenEMR installation?
Verify the system permissions while also checking for database configuration accuracy before restarting XAMPP service operations.
-
3. Can I use OpenEMR on other platforms besides Windows?
The OpenEMR system functions on Linux and macOS operating systems with server setups that include XAMPP and LAMP.